
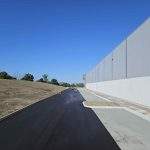
Do you ever wonder how asphalt starts with a blank slate and ends with a smooth blacktop surface?
Of course, all paving projects are different. Occasionally, there may be a step that isn’t always required, depending on the nature of the project. Generally speaking, however, there are eight steps we follow for asphalt paving installation.
Keep reading to learn more!
Step #1: Remove Any Old Materials
Unless we are working with a clean slate, we will need to create one by demolishing and removing any old asphalt or concrete.
Like some other paving contractors, we have a full fleet of equipment and machinery that allows us to break up old materials and recycle them in future mixes.
Step #2: Grade and Slope the Surface
Grading and sloping are critical—not only to lay your new asphalt pavement properly but also to ensure that rainwater drains correctly.
Fortunately, our highly-trained crew has all of the knowledge, experience, and tools to make sure that the area is graded and sloped for proper drainage.
Step #3: Develop the Sub-Base Layer
The importance of a strong sub-base layer cannot be overstated, as the sub-base is responsible for supporting your pavement and preventing frost damage during the winter.
After developing the sub-base layer, we compact it to perfection so that it is rated to support heavy loads for years to come.
Step #4: Install the Binder Layer
Next, we will install the binder layer, also known as the base coat. This is a much courser layer than the top layer your pavement will receive. It consists of large pieces of aggregate that not only strengthen the pavement but also allow the top layer of the blacktop to bind to the surface.
Step #5: Lay the Top Layer of Asphalt
With a strong foundation and binder layer in place, we will lay the top coat of your asphalt—the area of the surface you will see once your paving project is complete.
In most cases, this layer of asphalt is jet-black and consists of very small pieces of aggregate.
Step #6: Fine-Tune Any Transitional Areas
Once the final coat of asphalt has been laid, we will make sure that there are smooth transitions between new and old asphalt.
This is important for not only the sake of consistency but also for proper drainage across your property.
Step #7: Perform the Final Roll
With all asphalt laid and smooth transitions between all areas of pavement, we will go over your entire surface one last time to ensure that it is fully compacted and smoothed.
By the end of this process, your new asphalt pavement will be complete, and you should be able to start using your surface in 48–72 hours!
Step #8: Provide Line Striping
Finally, we will provide any line striping and pavement markings you might need to keep traffic organized.
Do you need a commercial asphalt paving company you can trust to see asphalt paving through to completion? Get in touch with the team at Empire Paving today and receive a free quote for your upcoming project!


 We were very pleased with the professional job done by Empire Paving this fall.
Luciano and his team were very reliable, knowledgeable and able to handle all issues that arose during completion of this project. We would highly
recommend Empire Paving for any paving job!
We were very pleased with the professional job done by Empire Paving this fall.
Luciano and his team were very reliable, knowledgeable and able to handle all issues that arose during completion of this project. We would highly
recommend Empire Paving for any paving job!